
Introduction
The M.2 NVMe external hard drive enclosure I ordered has finally arrived.
This article will provide instructions on installation and speed testing for future reference.
The ultimate goal is to assemble a USB 3.2 Gen 2 SSD external hard drive.
External Hard Drive Enclosure
Continuing from the previous article M.2 SSD External Drive Buying Guide.
After considering aesthetics and requirements, I chose the iTGZ enclosure, which features the Realtek RTL9210 chipset.
I purchased it on Taobao for approximately CNY 65 including shipping, about TWD 295 (USD 43.95).

The package includes:
- M.2 external hard drive enclosure.
- Cross screwdriver.
- 20cm data cables: one Type-C to Type-C and one Type-C to Type-A.
- Heat sink.
M.2 SSD
The RTL9210 itself supports PCIe Gen3×2 and is designed for USB 3.2 Gen 2, which means PCIe 3 is sufficient.
For this setup, I chose the KIOXIA EXCERIA G2 1TB from Toshiba, known for:
- Read and write speeds exceeding 1200 MB/s.
- Controller: Phison E12C.
- NAND type: TLC.
- Cost-effective.
Purchased on February 1, 2024, from Nan Fong 3C at a sale price of TWD 1590 (USD 50.28), with a TWD 200 discount coupon applied, resulting in a final payment of TWD 1390 (USD 43.96).

Installing M.2 SSD into the External Enclosure
Installing the SSD into the external enclosure is straightforward:
- Use the included screwdriver to open the external enclosure.
- Insert the M.2 SSD.
- Apply the heat sink.
- Close the enclosure and secure the screws.
Connect the enclosure to the computer using the provided cable.
Formatting and 4K Alignment for External SSD
When initially connected, the SSD may not appear on the computer because it needs to be formatted.
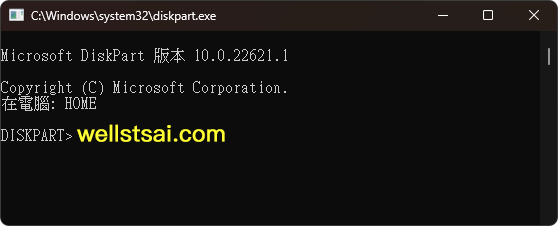
First, press Win + R on the keyboard to open the Run dialog, type diskpart, and press Enter.
Type list disk to display information about the disks currently connected to the computer:
| |
To select Disk 2, which is the SSD in the external enclosure, on this computer, use the select disk 2 command:
| |
Create a primary partition with 4K alignment on Disk 2:
| |
To format the partition as exFAT quickly, enter format fs=exFAT quick. exFAT format allows access on Windows, macOS, Android, and iOS.
| |
To display the labels of the volumes, use the command list vol. Currently, Volume 3 does not have a label.
| |
To select volume 3 and assign it the disk letter E, use the command sel vol 3 followed by assign letter=E:
| |
Upon opening This PC (Windows Explorer), you will now see the external hard drive.

Hard Drive Speed Test
The speed tests were conducted using two tools, CrystalDiskMark and AS SSD Benchmark. Here are the results:
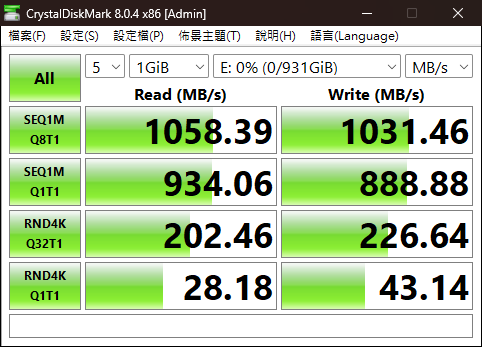
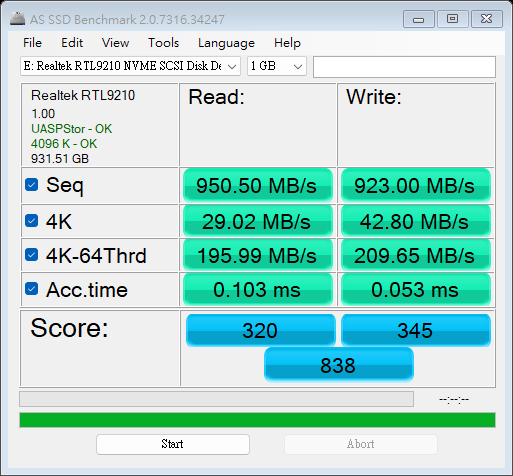
The sequential read/write speeds were observed to be around 900 MB/s.
For practical testing, copying 115 GB of data consisting of 29 files took approximately 2 minutes and 30 seconds.
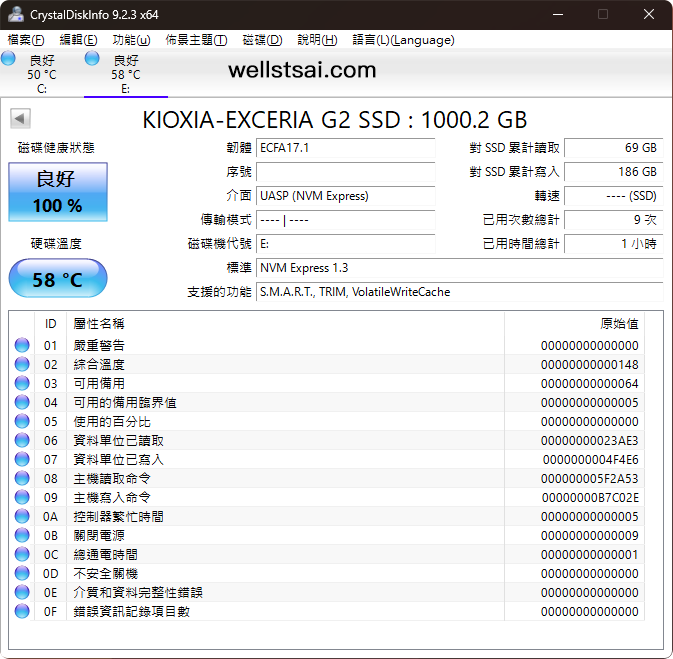
The temperature started at 35 °C while idle, rose to 58 °C during the copy process, and dropped back to below 50 °C within 30 seconds after copying.
The copying speed averaged around 700 MB/s.


Conclusion
Considering the price of TWD 1685 (USD 53.28), assembling a 1 TB USB 3.2 Gen 2 SSD external hard drive seems to offer excellent value for money.
Further updates will depend on any issues encountered during future use.