Introduction
When purchasing wireless routers and other network communication devices, routers with specifications like AC3000, AX6000, and BE7000 have become the mainstream choice for modern home networks.
Take a specific brand as an example, their wireless speed characteristics are highlighted as follows:
Wi-Fi 5 (1024 QAM): up to 1733 Mbps. Wi-Fi 6 (2.4 GHz): up to 574 Mbps. Wi-Fi 4: up to 300 Mbps.
These transmission speeds indicate the theoretical maximum transmission speed when two terminal devices (such as mobile phones or computers) are connected to these Wi-Fi hotspots. If both devices support Wi-Fi 5 and 1024 QAM, their maximum transmission speed can reach 1733 Mbps, allowing higher-speed data transmission between two devices within the internal network.
One important point to note is that transmission speed refers to the theoretical maximum transmission speed the router can provide under optimal conditions. The actual transmission speed is influenced by many factors, such as:
- Distance between devices (weaker signal results in higher error rates).
- Obstacles (such as walls and corners).
- Co-channel interference (Bluetooth products).
- Network congestion (multiple devices uploading or downloading simultaneously).
- Quality of Service (QoS) priority.
- Poor device design (heat, antenna, EMI).
- Cables (network cables).
- Wireless signal band and channel selection.
- Wireless protocols and encryption methods.
- Terminal hardware performance (processor speed and memory size).
Therefore, to know the actual transmission speed between two devices, you can use iPerf3 for speed testing and evaluation. This can also be applied to external network, VPN, or Tailscale speed testing.
It’s worth mentioning that if you apply for a network with, for example, 300 Mbps/300 Mbps (download/upload), the actual transmission speed will be affected by various factors:
Testing
Device AandDevice B: Device A connects to a wireless router using a Wi-Fi 6 network card on the 2.4 GHz band (up to 574 Mbps). The wireless router connects to an external telecom device (up to 300 Mbps), then to client B’s telecom device (up to 300 Mbps), limiting the speed to a maximum of 300 Mbps. If client B’s telecom device is 100 Mbps, the speed will be limited to 100 Mbps.Testing
Device AandPhone: Device A uses a CAT-5 wired network (up to 100 Mbps) to access the internet, while the phone connects to the router using the 2.4 GHz band (up to 574 Mbps). The maximum speed during the test will be limited by the wired speed to only 100 Mbps. To improve network speed, Device A can use a wireless network card or change the network cable, such as CAT-5e supporting 1 Gbps.Network speed is influenced by terminal device hardware parameters, transmission protocols, and the
lowest speedin the entire telecommunications link.
Installing iPerf3
Linux
The official version is available for Ubuntu / Debian / Mint / Fedora / FreeBSD, mostly installable through package managers. For ARM architecture, you can download the ARM version of iPerf3 directly from GitHub or compile the source code yourself.
The following explains the installation for Ubuntu 20.04:
| |
To remove iperf3, use the following command:
| |
After installation, check the output version, which should be iperf 3.9 (cJSON 1.7.13)
| |
Windows
iPerf3 is maintained by the Energy Sciences Network (ESnet) and provides a compiled version for Linux. The current Windows version is compiled and maintained by community developers, who have ported iPerf3 via Cygwin to the Windows platform, maintaining feature parity with the Linux version.
To use iPerf3 on Windows, download it from the recommended sites: BudMan or ar51an.
Find the latest dated zip package, such as iperf-3.17.1-win64.zip, download and extract it to use.
Command Overview
Common commands are as follows. For more advanced usage, refer to the help section.
| Command | Syntax |
|---|---|
| Start a server | iperf3 -s |
| Start a server on a specific port | iperf3 -s -p 5205 |
| Client upload (to Server) | iperf3 -c IP_ADDRESS/HOST |
| Client download (from Server) | iperf3 -c IP_ADDRESS/HOST -R |
| Client download with 4 parallel streams | iperf3 -c IP_ADDRESS/HOST -P 4 |
| Use IPv6 protocol version | iperf3 -c IP_ADDRESS/HOST -6 |
| UDP test | iperf3 -c IP_ADDRESS/HOST -u |
Setting up an iPerf3 Server
Test the network speed between two devices, where nodeA acts as the server, and nodeB simulates upload or download behavior.
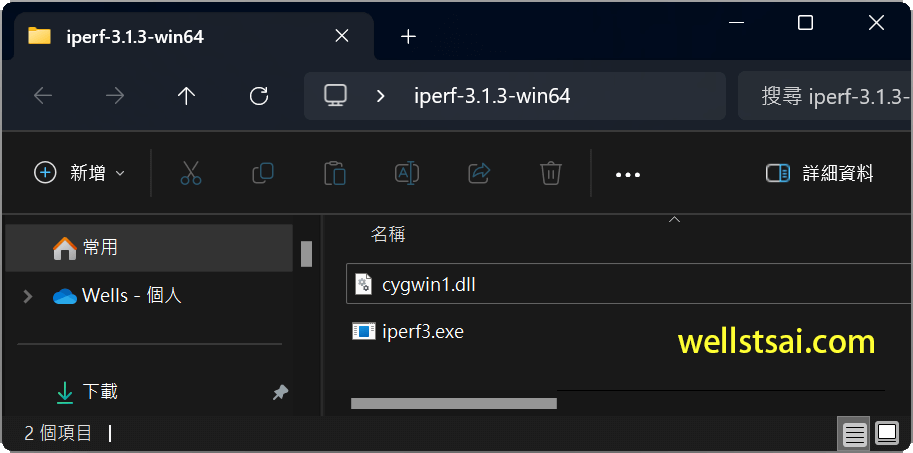
Open the iperf3 directory.

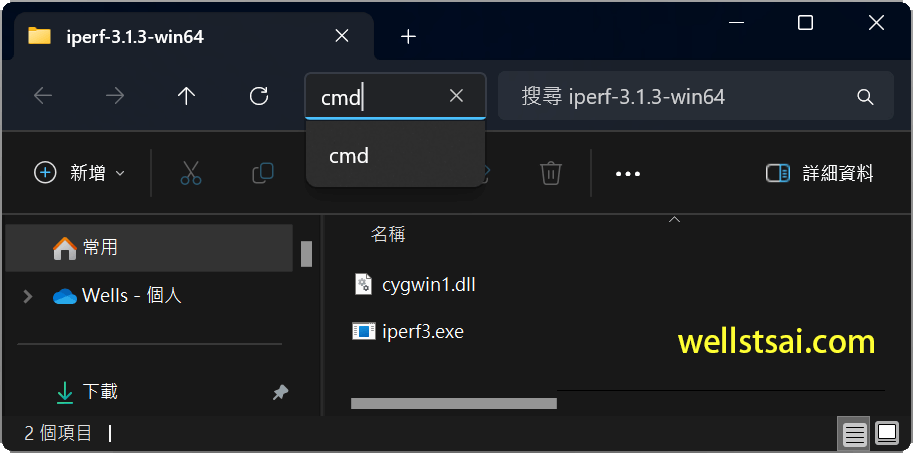
Type
cmdin the path bar.
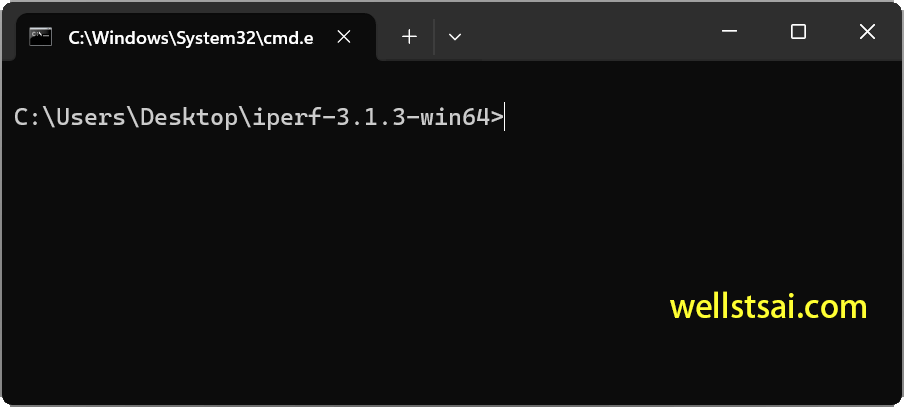
Confirm that the command prompt opens in the iperf3 directory.

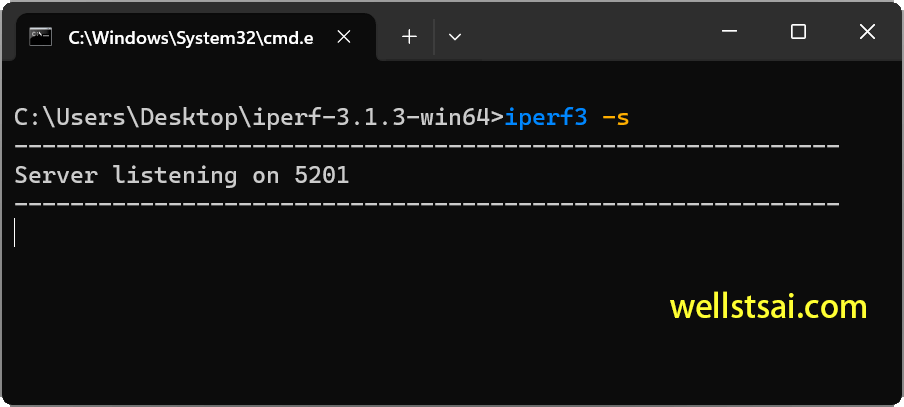
Enter
iperf3 -sto start the iperf3 server, which will open port 5201 and wait for client connections.
To specify a different port, use iperf3 -s -p 5205. Clients will need to connect using the corresponding port number.
Direct Connection via Internal Network
Hardware setup: Two computers connected via wired network, passing through several routers. NodeA acts as the server (192.168.1.30).
After nodeA sets up the server, enter iperf3 -c IP_ADDRESS/HOST on nodeB to test the upload speed from nodeB to nodeA.
| |
The meanings of the table parameters are as follows, with an emphasis on the Bandwidth parameter:
- ID: Typically represents the connection number.
- Interval: The time interval for the test.
- Transfer: The amount of data transferred during this interval.
- Bandwidth: The average bandwidth during this interval, represented as the transmission speed.
- Retr: In network transmission, when data packets are lost or damaged during transmission and cannot be correctly received by the recipient, the recipient requests the sender to resend these data packets. The number of retransmissions can reflect the reliability and stability of the network connection. Ideally, the fewer retransmissions, the better, as this indicates fewer packet loss incidents during data transmission.
- Cwnd: Congestion window size, measured in KBytes (kilobytes). This value represents the amount of data the sender can transmit before waiting for an acknowledgment.
From the table, it can be seen that the average speed at which nodeB transfers data to nodeA is 711 Mbps.
To test the download speed of nodeB, i.e., the transmission direction from nodeA to nodeB, use iperf3 -c IP_ADDRESS/HOST -R:
| |
The average speed of data transfer from nodeA to nodeB is 848 Mbps.
Internal Network IP address via Tailscale
After setting up a network through Tailscale, you can evaluate the transmission speed between two nodes by directly entering the hostname of the other node.
The following test uses the same computers but switches to using the Tailscale hostname for testing.
Upload test results:
| |
Download test results:
| |
Compared to direct IP address connection, the upload speed via Tailscale is reduced to 52% of the original speed, and the download speed is reduced to 82% of the original speed.
Multiple Parallel Client Connection
To test the performance of the server, you can use iperf3 -c IP_ADDRESS/HOST -P client_counts.
For example, to simulate 3 clients downloading simultaneously:
| |
Conclusion
After using iPerf3 for speed testing, if the network speed does not meet your requirements, further troubleshooting may be necessary.
For home internal networks, factors such as cable quality, device configuration, and protocol support may be the main causes of poor network speed.
Sometimes, simply restarting the router can normalize the speed. If this frequently happens, it might be time to consider evaluating a new router.
When encountering slow speeds with Tailscale, you can use the tailscale ping host command to determine whether the device is directly connected or relayed through a DERP server.
In my experience, Tailscale usually connects directly. However, occasionally, after connecting to certain Wi-Fi networks, it starts using DERP relays. Even disconnecting from Wi-Fi and returning to the original network doesn’t resolve the direct connection issue. In such cases, forcibly restarting the Tailscale service can sometimes fix the problem.
