Introduction
In the previous article, we covered Creating, Switching, and Deleting Git Branches.
This article focuses on explaining how to rebase and merge branches in VS Code.
Example Scenario
⚠️ Before proceeding with the following operations, please ensure all changes have been committed to the repository and there are no staged changes.
Merging
After cloning from the remote repository to the local one, if we want to develop a new feature, we will create a new branch and continue committing changes.
For example, assuming the current main branch is main (or master), and we want to develop a new algorithm feature. This new feature will be based on the current committed content, so we can create a new branch (e.g., feature/alg_dev).
After completing the algorithm development, we can merge the feature/alg_dev branch into the main branch and push the changes.
(Alternatively, we can rebase the feature/alg_dev commits onto main before pushing, or switch to the main branch and perform a cherry-pick before pushing.)
Rebasing
In the current branch, we can choose a commit as the starting point and modify all subsequent commits.
For example: We are currently developing on a commit: Node → Commit A → Commit B (feature/alg_dev)
Then we discover new commits on the remote: Node → Commit 1 → Commit 2 (main)
We can rebase by switching to the feature/alg_dev branch and starting from Commit 2, resulting in: Node → Commit 1 → Commit 2 → Commit A → Commit B, integrating the new feature.
Another scenario: Node → Commit A1 → Commit A2 → Unnecessary Test C → Commit B1 → Commit B2
We can use interactive rebase to reorder, squash, drop, edit, or reword commits, compressing them into: Node → Commit A → Commit B
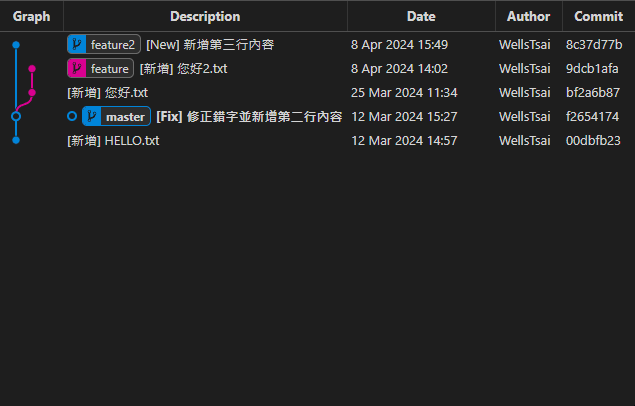
Current Branch Status
Everyone’s branch status varies. Here, we continue from the previously created test Git repo in the article Getting Started with Git for Project Management.
It is highly recommended to start with a simple repository for practice. Familiarity with the entire process can be achieved in about half a day.
Changing Git Default Editor
When using Remote SSH to connect to Linux for Git operations, the editor might be vim or nano. You can change the Git editor to VS Code with the following command:
| |
On Windows, the default should be VS Code. If not, you can also run the above command to change it.
Merging
Merging branches is the process of integrating changes from one branch into another. It creates a special merge commit that records the differences between the two branches.
Points to note:
- Merge Conflicts: When different branches modify the same part of a file, merging can cause conflicts. Resolving conflicts requires manually selecting which changes to keep, which needs familiarity with the original content.
- History Preservation: Merging retains branch history. If each new feature development involves merging branches, it can result in a complex and extensive history. Someone may need to clean up the history.
Merging Branches
Merging branches is straightforward. Assuming the current SHA of master is f2654174, we switch to the master branch and right-click on the feature branch, selecting Merge into current branch.
Three options will appear:
Create a new commit even if fast-forward is possible
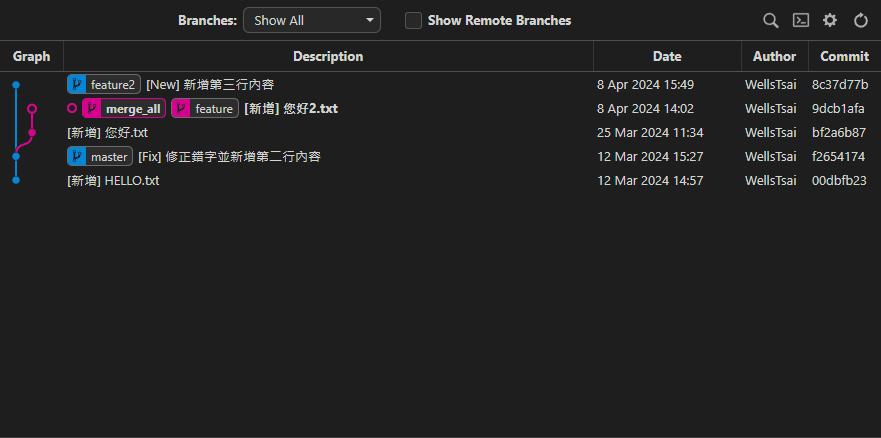
Fast-forward occurs when branches are linear. Selecting this option creates a new commit (
f68077d6); if not selected, themasterHEAD will directly move to9dcb1afabecausefeatureis linear tomaster.If switching to the
feature2branch and mergingfeature, since they are not linear, this option will always create a new merge commit regardless.Squash Commits
This will additionally compress and then commit, so
bf2a6b87and9dcb1afawill be squashed into a new commit.No Commit
This will compress the commits from the
featurebranch and stage them without creating a new commit.
Rebasing
Rebasing re-applies changes from one branch onto another. This method can create a more linear and clean commit history.
Points to note:
- Switch to a temporary branch before rebasing: It is recommended to create a temporary branch before rebasing. If any mistakes occur, you can always abort and return to the original state.
- ⚠️ Changes history: Rebasing modifies history. In collaborative projects, pushing a rebased branch to a remote repository can cause conflicts due to history mismatches with other contributors.
- Conflict handling: Conflicts may arise due to the modified history during fetch, commit, or push operations.
- Two types of rebase: There are standard rebase and interactive rebase. For beginners and advanced users, interactive rebase provides more control and flexibility. Unless you fully understand the current branch state and the actions you are performing, it is advisable to use interactive rebase first.
Interactive Rebase
During an interactive rebase, we select a specific commit as the starting point and make a series of adjustments and modifications to the subsequent commits. Here are the operations you can perform on commits during the interactive rebase process:
- pick: Select this commit and keep it unchanged.
- reword: Modify the commit message without changing any file content.
- edit: Pause the rebase process here, allowing you to modify the commit itself, such as changing file content or the commit message.
- squash: Combine this commit with the previous one, merging both commit messages.
- fixup: Similar to squash but discards this commit’s message, keeping only the previous commit’s message. (This is rarely used.)
- drop: Discard this commit, removing it entirely from the commit history.
Pick
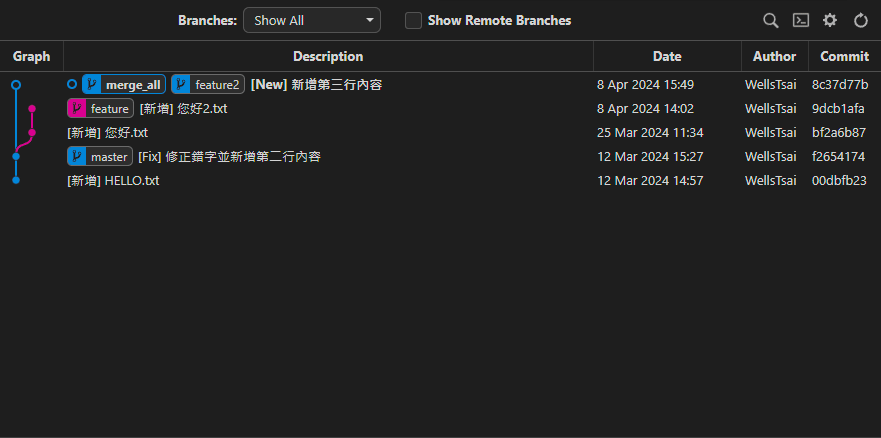
Rebase the changes from feature2 onto feature.
First, switch to the feature2 branch (create a new branch merge_all to prevent mistakes), and rebase starting from the last commit on feature, using the pick action.
Conversely, rebase the changes from feature onto feature2.
Switch to the feature branch and rebase onto feature2.
This will append the [Add] Hello.txt and [Add] Hello2.txt commits from feature after [New] Add third line content on feature2. If there are unwanted commits during the rebase process, change pick to drop.
Squash Commits
Merge changes from feature into feature2 and squash multiple commits. You will be prompted to enter commit messages during the rebase process.
Reword Commit Messages
Merge changes from feature into feature2 and modify specific commit messages without merging. Choose reword during the rebase process to edit commit messages.

Edit Commit Content
Lastly, we have the edit option during rebase. Suppose we initially committed a bunch of files, but this commit should be split into separate commits. We can use rebase → reset → commit to split the files into individual commits. Editing commit content can also simply modify messages or perform other actions like cherry-pick or adding files.
For example, suppose the [Add] Bunch.txt commit has two file changes that should be separate commits. Rebase at the previous commit, choose edit, and enter a detached HEAD state with HEAD pointing to [Add] Bunch.txt.
Next, we need to reset the previous commit (git reset HEAD~1). This will revert HEAD to the previous commit [New] Add third line content, and the files in [Add] Bunch.txt will be staged.
Unstage all changes, and re-stage them selectively. Due to VS Code limitations, commits cannot be made via the UI in rebase state, so use the command line to create new commits:
| |
After committing the files, complete the rebase process with the following command:
| |
Push
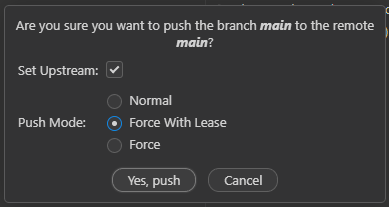
After rebasing, pushing to the remote server will inevitably cause conflicts since the local and remote parent nodes (Parent Nodes) are inconsistent. If the branch has other contributors, the push mode must be set to “Force With Lease” to ensure that others’ commits are not overwritten.
Conclusion
Rebasing is typically used to maintain a clean, linear commit history. In my current projects, I prefer rebasing over merging branches.
However, merging retains the historical context between branches, which might be more suitable depending on team habits, permissions, and strategies. When it is important to maintain a complete development history, merging branches is the better choice. Ultimately, someone in the team may be responsible for keeping the repository as clean and traceable as possible, often depending on the quality of the commit messages written by the original authors.
Moreover, whether using rebase or merge, conflicts are inevitable. When dealing with unfamiliar repositories, it can be difficult to know how to resolve merge conflicts due to a lack of understanding. It is advisable to become more familiar with the code before proceeding. To avoid troublesome mistakes, it is recommended to create a new branch before performing the above operations. If any issues arise, you can use git rebase --abort to cancel the rebase at any time. Ensure the rebase is successful and conflict-free before deleting the original branch and renaming the temporary branch.
When faced with long and messy commits, compressing everything might be a good solution, especially if the commits are over five years old and lack commit messages. Ultimately, this is often a company policy issue.
Finally, when rebasing in a collaborative environment, use “Force With Lease” to push. This is a safe and widely accepted practice.