
We all consume a torrent of information online every day. You might watch a YouTube tutorial on camera settings, look up how a dehumidifier works, compare sous-vide machines, or catch up on the latest iOS features.
The challenge, however, is that this knowledge is fleeting. Most of it is never captured; you watch a 30-minute video, and an hour later, the key takeaways have vanished.
There are established ways to combat this, such as using AI summarization tools or diligent note-taking. We have previously covered how to use ChatGPT to analyze YouTube videos and how Faster Whisper can pull a transcript from virtually any media file. From there, you can feed the text to an LLM—like ChatGPT, Gemini, or Claude—to be summarized and reorganized before saving the polished notes to a tool like Notion.
While this workflow is effective for personal use, it can be taken a step further. Instead of simply archiving your notes, you can instantly turn them into a polished, single-page website to share with the world.
This article details an automated, end-to-end workflow that uses AI to distill online content, generate a complete website, and deploy it via GitHub Actions, empowering anyone to publish their findings without writing a single line of code.
AI-Powered Content Consolidation
AI tools such as ChatGPT and Gemini excel at synthesizing disparate inputs into actionable insights. Supported input types include:
- Full-text articles and PDFs
- YouTube video transcripts
- Live, aggregated web search results
For aggregating search results for research, two leading options are Perplexity and Gemini.
1. Perplexity — Synthesized Analysis
- Aggregates multiple sources to produce a single synthesized view.
- Designed for deep research: uncovers insights from multiple perspectives and builds foundational understanding.
- Provides citations with links to original sources for verification.
2. Gemini (Deep Research) — Automated Reports
- Performs automated web analysis by browsing and summarizing relevant content.
- Generates comprehensive, well-structured research reports rapidly (typically within minutes).
- Handles complex topics that require extensive information gathering.
From Content to Code: Generating a Web Page with AI
With high-quality content prepared, it’s time to build the web page. You don’t need to code it by hand; an LLM can generate the complete HTML for you. The key is to provide a detailed prompt that includes concrete design guidelines and technical requirements.
Here is a powerful prompt structure to get you started:
| |
Through iterative conversation with the LLM, you can refine any of these parameters to generate a final index.html file that is not only visually appealing but also highly performant and interactive.
Deploy Static HTML to GitHub Pages
GitHub Pages is a powerful feature for hosting static websites directly from a GitHub repository. We will cover two methods: a straightforward manual upload and a more robust, automated workflow.
Prerequisites
Before you begin, make sure you:
- Have a GitHub account.
- Have Git installed locally.
- Understand basic Git operations such as
clone,add,commit, andpush.
If you’re new to Git, see:
Manual Deployment to a Public Repository
This straightforward approach is ideal for simple projects where your source files can be made public.
First, create a new public repository on GitHub (e.g., single-page-conclusion).
For this example, assume you have a generated HTML file named Git Common Commands Overview.html. Place this file in your local project folder. Next, use Git to commit and push your file to the dedicated gh-pages branch. GitHub Pages is specifically configured to serve content from this branch for project sites.
Once the push is complete, you can view your live page at:
https://<your-username>.github.io/<your-repo-name>/Git Common Commands Overview.html.
Automated Deployment with GitHub Actions
For projects with private scripts, prompts, or other sensitive source materials, a manual public push is not a secure option. The professional standard is to use a private repository for development and an automated workflow to deploy only the final, public-facing files to a separate public repository.
GitHub Actions provides the automation for this workflow. When you push code to your private repository, it triggers a series of predefined steps that build and publish the final static site to your public repository.
For clarity, this setup uses two repositories:
- Private repository:
single-page-conclusion-deployStores all source code, build scripts (.sh), and prompts (.txt). This is your main working area. - Public repository:
single-page-conclusionStores only the final static HTML files and has GitHub Pages enabled to serve the live site.
Creating a Personal Access Token (PAT) for Authentication
To grant the private repository’s Actions workflow permission to push to the public repository, you must create a secure credential. The standard method is a Personal Access Token (PAT).
Generate a PAT
Go to GitHub’s Personal Access Tokens page, click
Generate new token, and selectGenerate new token (classic).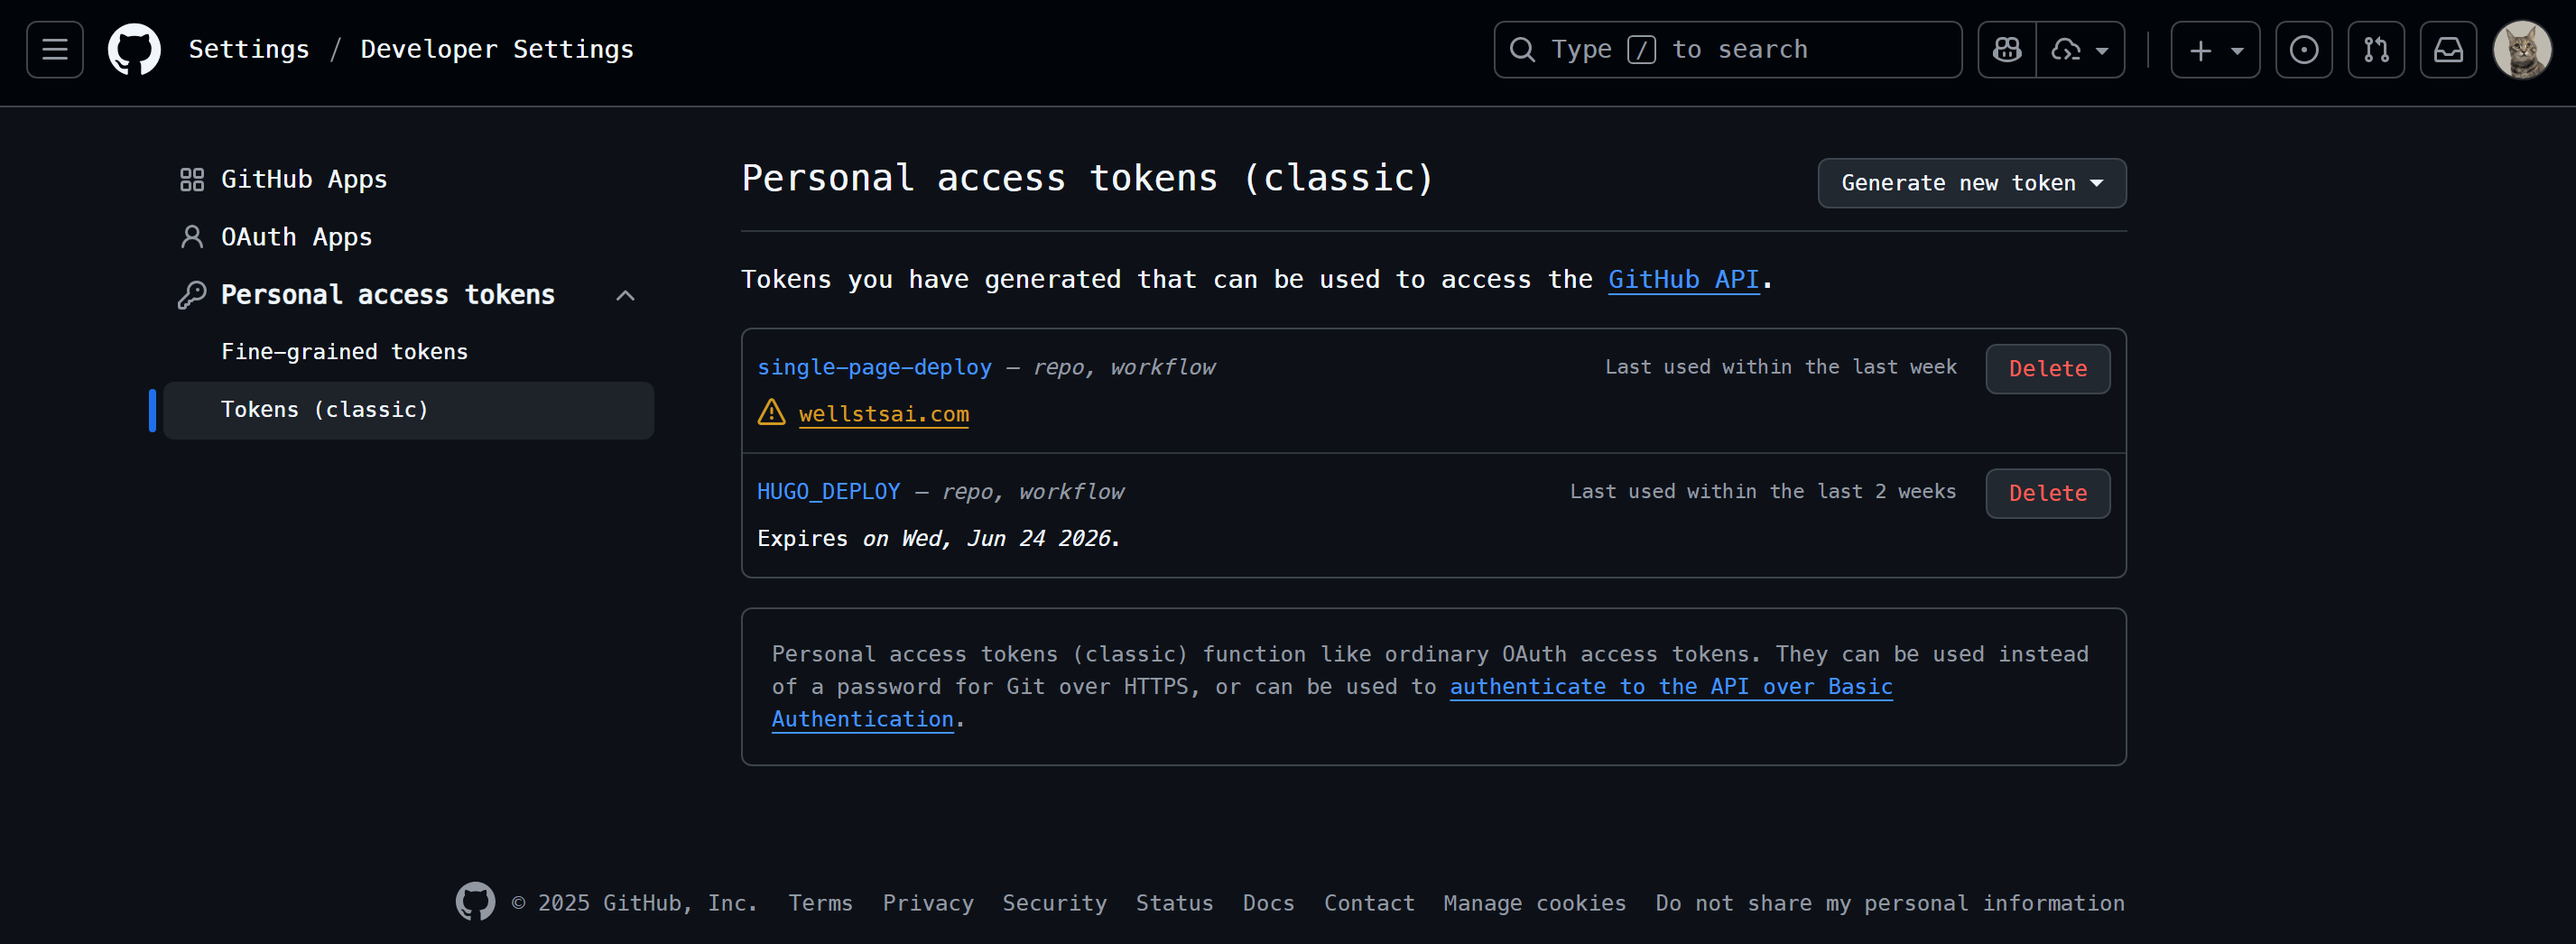
Set Token Scopes
Under
Select scopes, ensure you select the permissions forrepoandworkflow. This grants the token the necessary permissions to read and write to your repositories and manage workflows.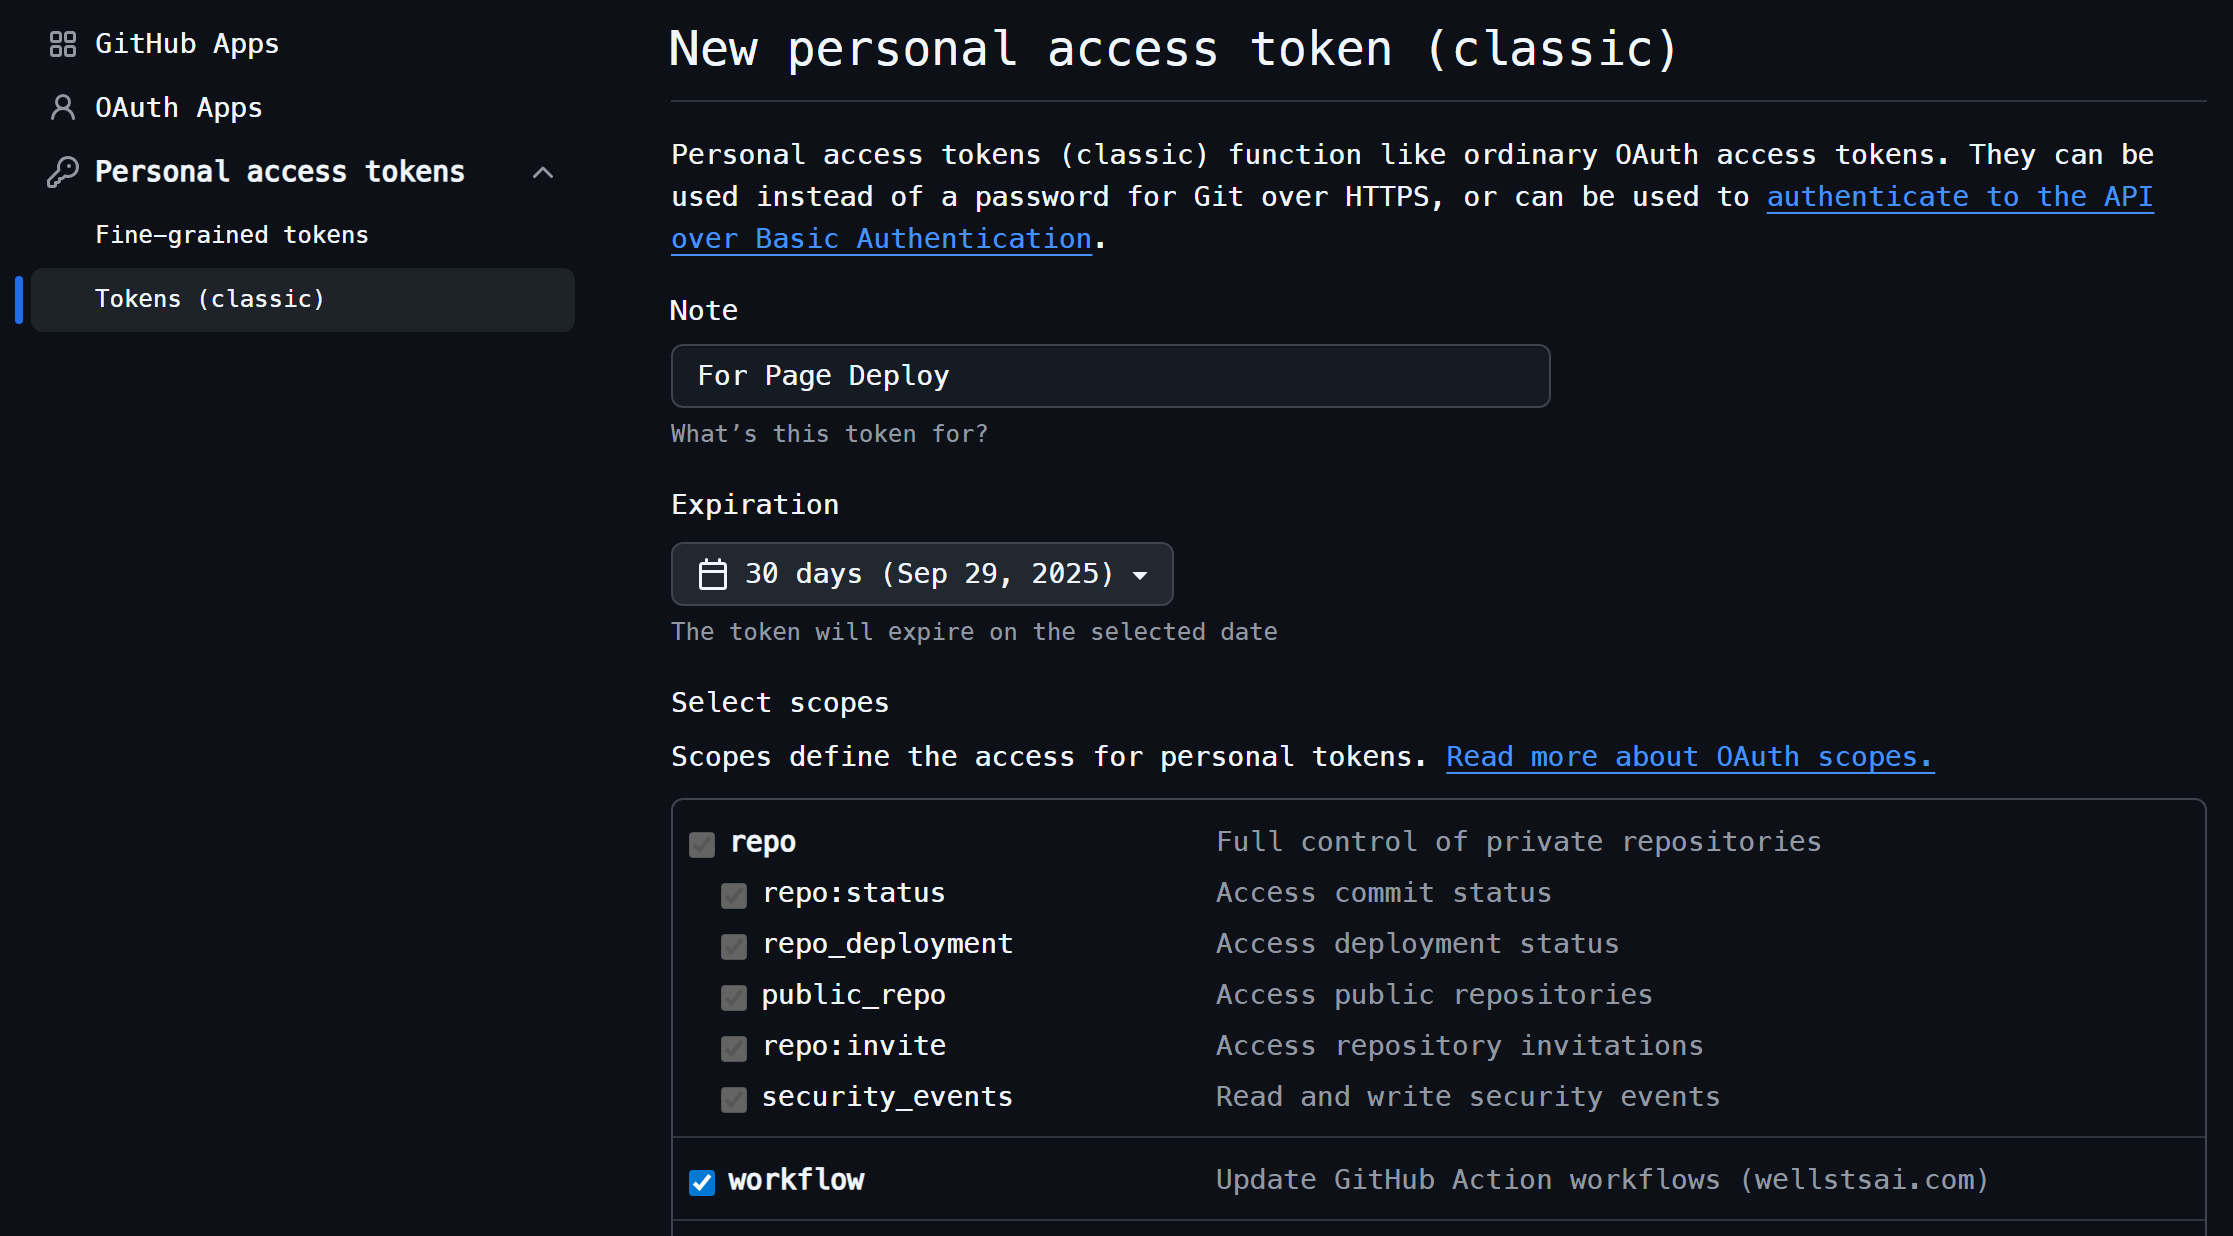
Copy the Generated Token
After generation, copy the token string immediately—it will not be shown again. It is a long string, typically starting with
ghp_, for example: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Add the Token as a Repository Secret
In your private repository (
single-page-conclusion-deploy), go toSettings>Secrets and variables>Actions, and clickNew repository secret. Name itGH_TOKENand paste the token.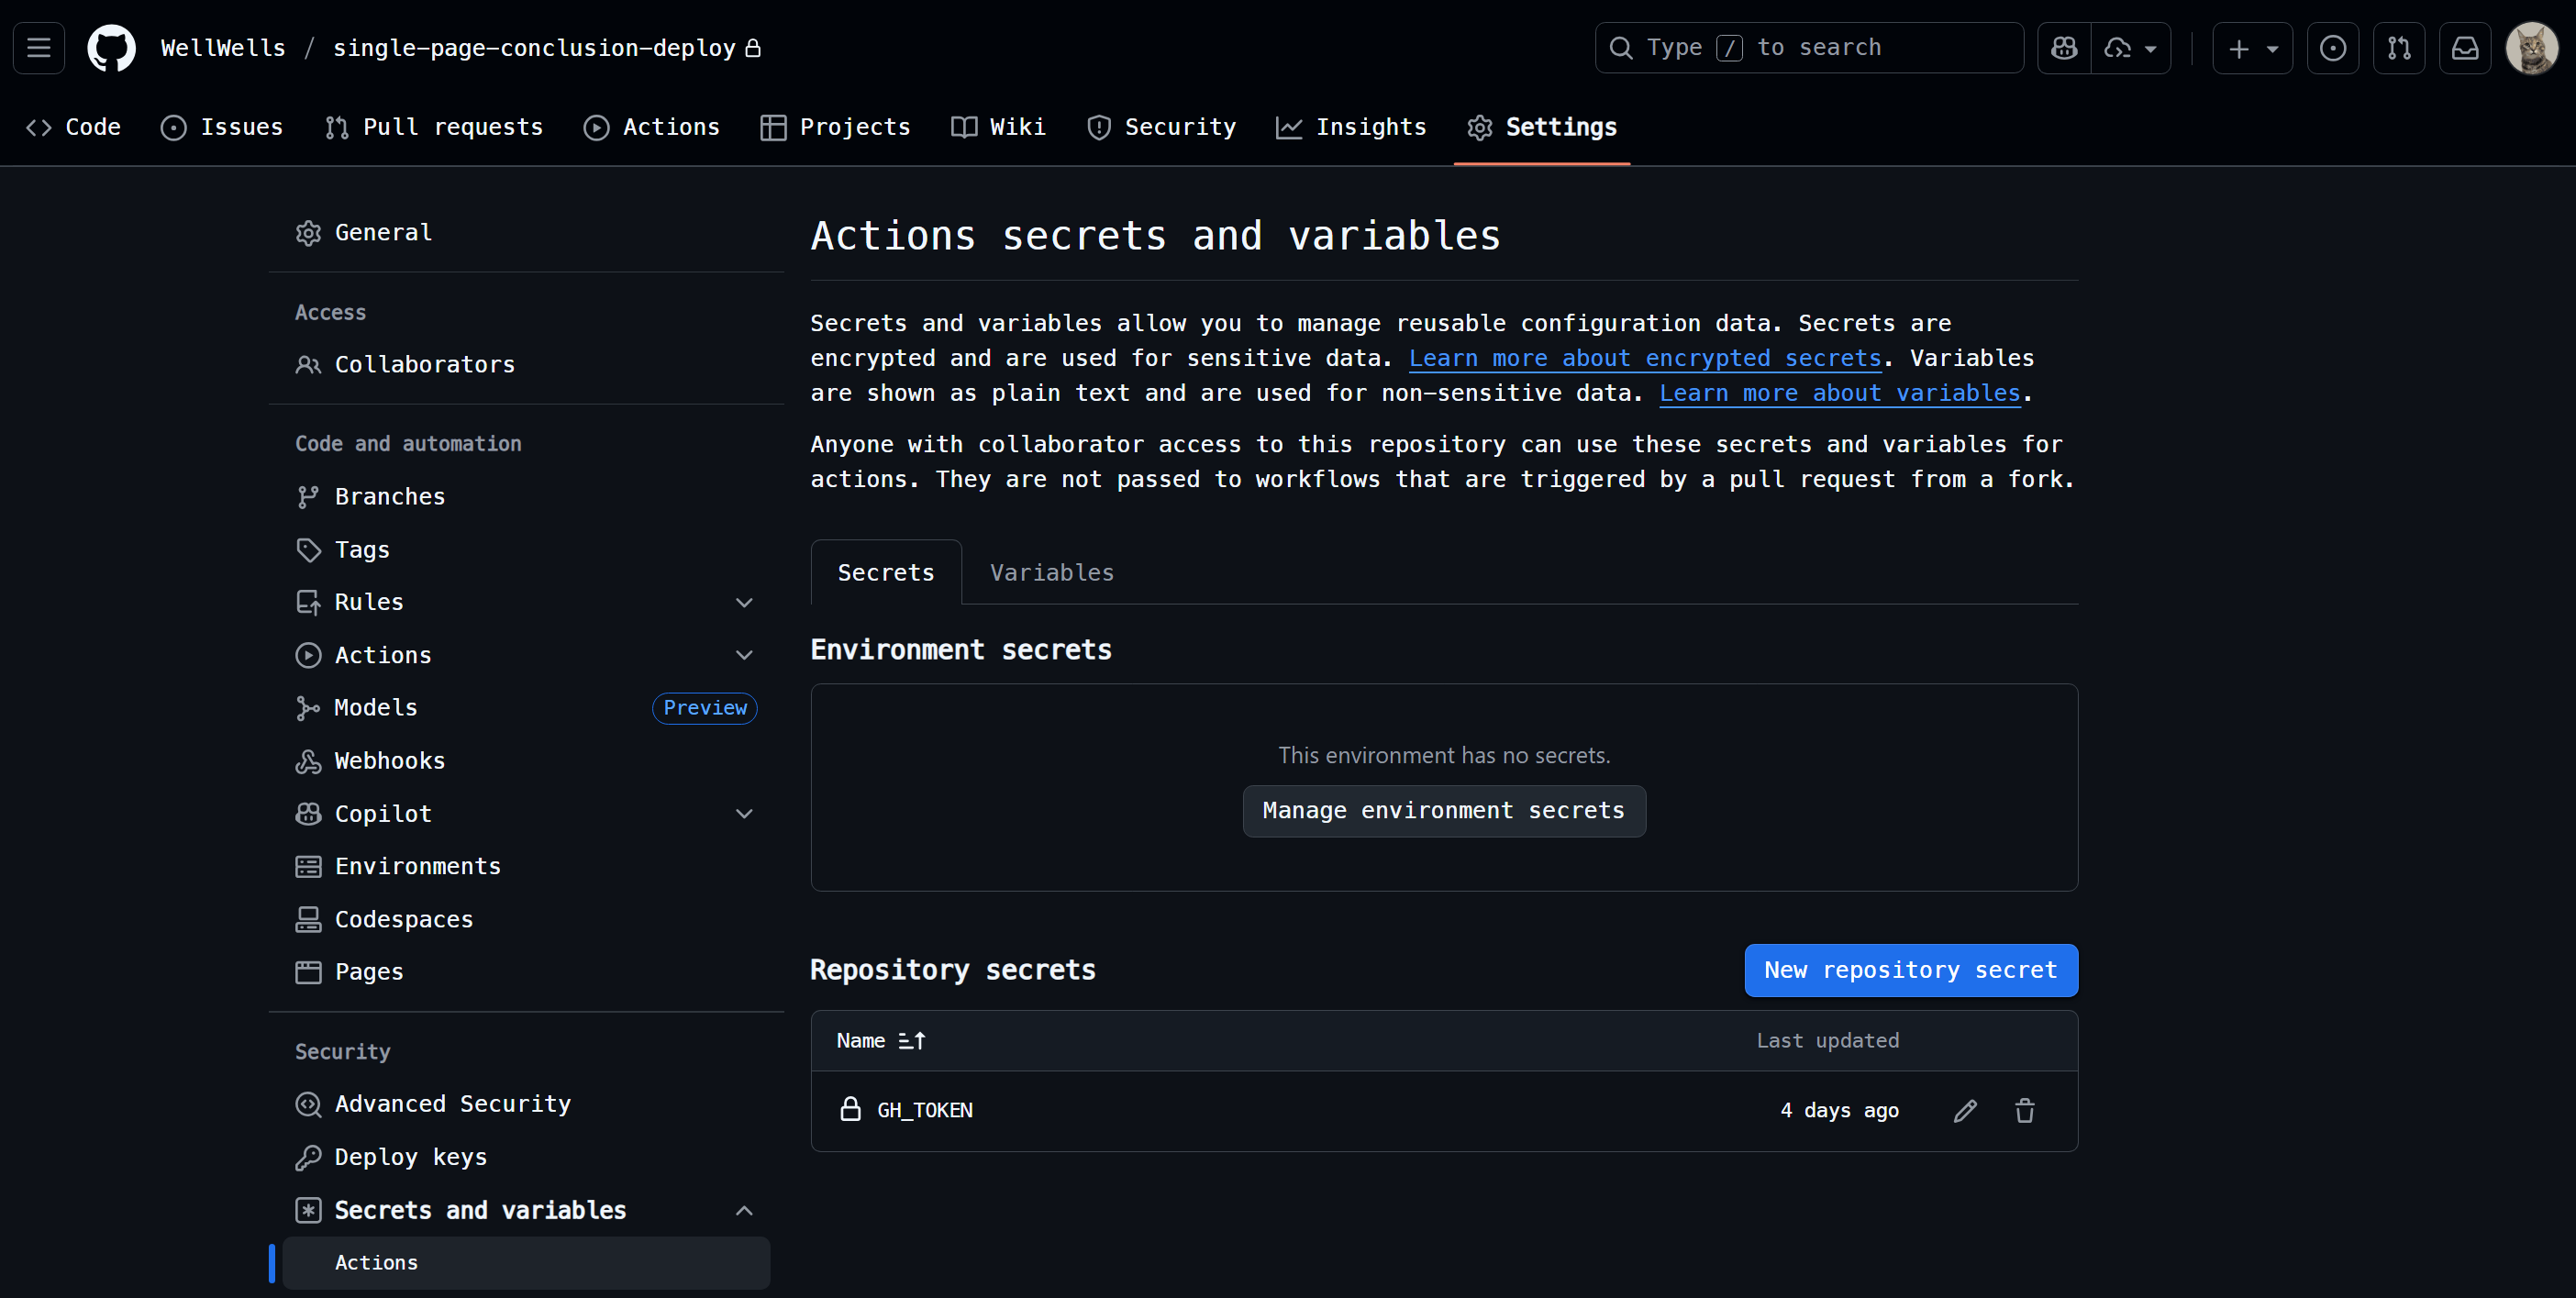
Once configured, this setup allows your workflow to securely access the token via the ${{ secrets.GH_TOKEN }} variable, authorizing it to push to the public repository.
Writing the Workflow Deployment Script
In my project structure, the following files are managed in the private repository:
./prompt.txt./update_rss.sh./update.sh./gh-pages/*.html
The files in the first three items represent your source materials and build scripts, which should remain private. Only the static HTML files inside the ./gh-pages/ directory are intended for deployment.
To automate the deployment, create a new file at ./.github/workflows/deploy.yml within the root of your private repository. Paste the content below into this file, ensuring you replace <USER>/<PUBLIC_REPO_NAME> with your specific GitHub username and public repository name.
| |
Once you commit and push this workflow file, your automation is live. From now on, every push to the main branch of your private repository will automatically trigger the workflow, deploying the latest static files. This process is also easily extensible; you could add steps to generate an RSS feed (rss.xml) or perform other pre-deployment tasks.
This approach ensures your source code and proprietary scripts remain secure in a private repository, while the public-facing site contains only clean, production-ready files.
Conclusion
This article has walked you through an end-to-end workflow, from synthesizing content with AI to publishing a complete website automatically. By combining the content-processing power of LLMs with the robust automation of GitHub Actions, you can reduce a complex, multi-step publishing process to a single git push.
The result is a powerful system that keeps your source materials private while deploying a polished, public-facing version of your work.
More than just a technical shortcut, this process transforms the very nature of learning. Compared to simply storing notes in a private folder, transforming your knowledge into polished, standalone web pages solidifies your own understanding and dramatically amplifies its value by making it accessible and impactful for others.
I’m currently publishing consolidated articles at “Wells Single-Page Conclusions.” Feel free to browse.
Here are a few examples where the interactive format helps make complex ideas more digestible and engaging:
- Overfitting: Why a Perfect Explanation is Often Useless
- (Chinese) 機率悖論的共同核心
- (Chinese) AI 溝通術:從提示詞到上下文工程
- (Chinese) Netflix 自由與責任文化指南
- (Chinese) DJI Osmo 360 vs Insta360 X5